


Underground water tanks are great if you want to harvest rainwater and not have valuable surface space being taken up.
Team Poly’s underground water tanks are made in Australia according to a patented and leading German-engineered design that provides optimum strength and optional self-cleaning filter.
Please refer to our underground tank installation guide for complete instructions. This article provides a summary on how to install Team Poly’s Li-Lo model of underground poly tanks.
Construction Site
Under all circumstances, the following points must be clarified prior to installation:
- The structural suitability of the ground according to DIN 18196
- Maximum groundwater levels which occur and drainage capability of the subsoil
- Types of load which occur, e.g. traffic loads
An expert ground report should be requested from the local planning authority to determine the physical characteristics of your subsoil.
Digging Hole for Tank
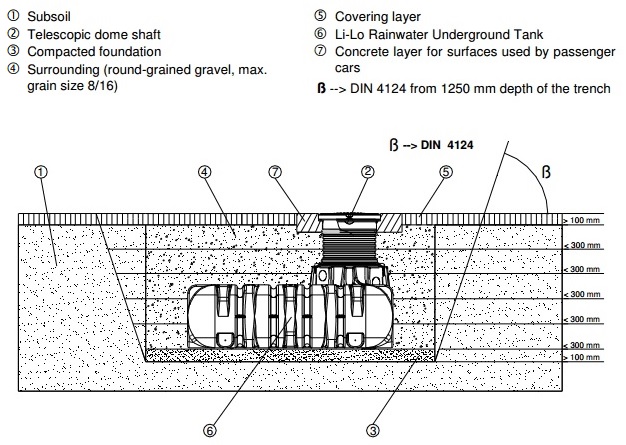
To ensure that sufficient space is available for working, the base area of the trench must exceed the dimensions of the tank by greater than 100 mm on each side; the distance from solid constructions must be at least 1000 mm.
If the depth of the trench is > 1250 mm an embankment must be designed according to DIN 4124. The construction site must be horizontal and plane and must guarantee sufficient load-bearing capacity.
The depth of the trench must be dimensioned so that the maximum earth coverage (see point 2 – installation conditions) above the tank is not exceeded. To use the system throughout the entire year, it is necessary to install the tank and those parts of the system which conduct water in the frost-free area. The frost-free depth is usually approximately 600 mm – 800 mm; precise information in this regard can be obtained from the responsible authority.
A layer of compacted, round-grain gravel (grain size thickness approximately 100 – 150 mm) is applied as the foundation. Please note the following with surrounding surface and soil types:

Connecting Multiple Tanks
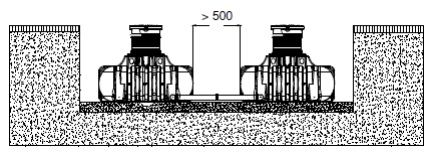
Two or more tanks are connected via the assembly surfaces by means of GARANTIA special seals and basic pipes. The apertures must be drilled to the corresponding size using only the GARANTIA special crown bit. It must be ensured that the distance between the tanks is at least 500 mm. The pipes must project at least 200 mm into the tanks.
 Insertion and Filling Hole
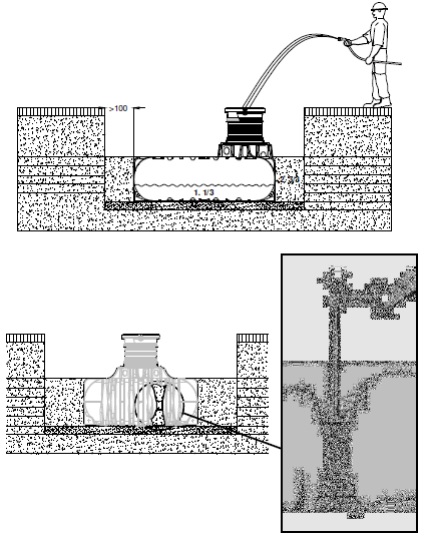
The tanks must be inserted, impact-free, into the prepared trench using suitable equipment.
To avoid deformities, the tank is filled one-third full with water before filling in the tank surrounding. Afterwards the surrounding (round grain gravel of 100–150mm thickness) is then filled in layers of at most 300mm. 30 cm steps and is compacted.
Note: The individual layers as well as the medial support column must carefully well compacted with manual tampering to avoid damage to your tank. Mechanical compaction machines must not be used under any circumstances. The surrounding towards the trench must be at least 100 mm wide.
Detailed instructions for installing the Team Poly’s underground tanks is in our underground tank installation guide. If you have any specific questions, contact the friendly staff at Team Poly.